Kubeflow: Machine Learning on Kubernetes - Part 1

Developing and deploying machine learning systems could be a pain with multiple things you need to manage. In this article, I introduce you and help you get started with Kubeflow while also understanding how Kubeflow works. This is the first article in the Kubeflow series and I will try to help you answer the question “Why and When Kubeflow?” and understand the Kubeflow architecture coupled with some of my experiences and tips.
Yet another tool?
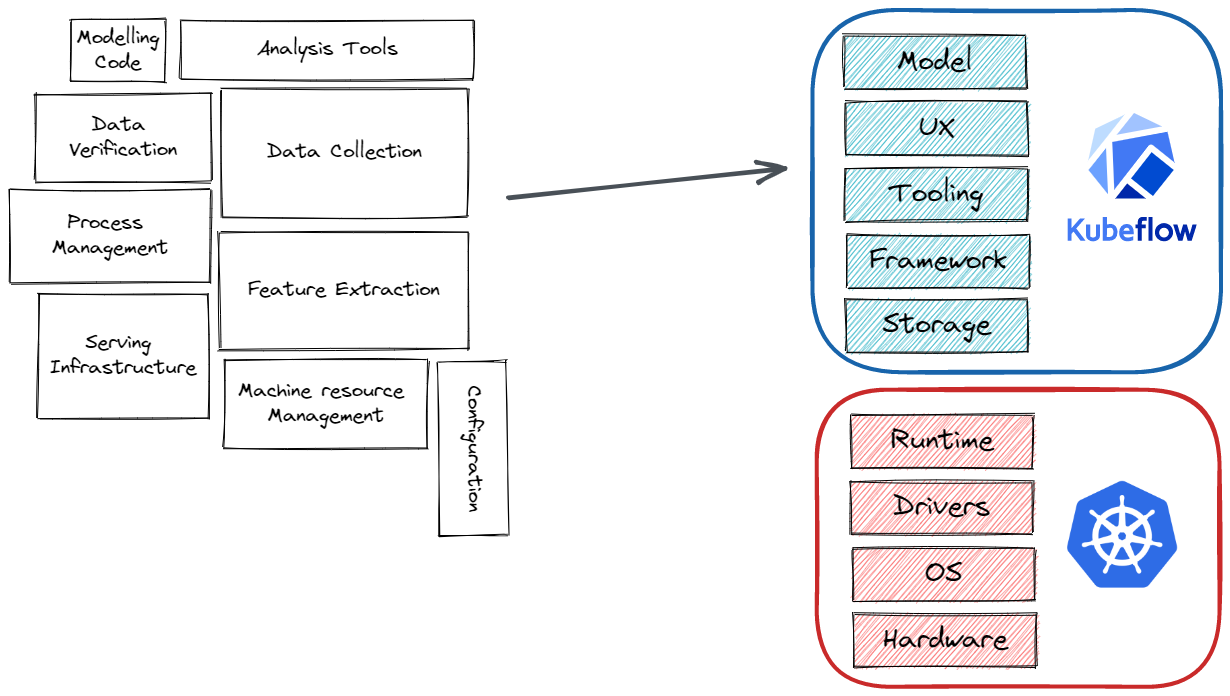
Successful machine learning deployments often consist of multiple pieces, when trying to build a model you may not be thinking about data preparation, model training, serving, infrastructure, or service management. To this extent writing the modeling code is a very small part of real-world ML systems with multiple other aspects you need to care about as depicted by this image adapted from 1.

Kubeflow allows you to make the deployment of machine learning workflows on Kubernetes simple, composable, portable, and scalable. You could easily make different stages of your machine learning workflow independent of each other, as an example: you most likely do not need the same set of tools while experimenting with your model or while training the model at scale, or while serving the model and so on. Kubeflow runs on top of Kubernetes which also means you could run it anywhere you can run Kubernetes be it your desktop, bare metal servers, public cloud, and more. As you might have already guessed, you could easily scale your system as and when required leveraging the abilities of Kubernetes.
Our goal is to make scaling machine learning (ML) models and deploying them to production as simple as possible, by letting Kubernetes do what it’s great at —kubeflow.org
Kubeflow began as just a simpler way to run TensorFlow jobs on Kubernetes but has since expanded to be a multi-architecture, multi-cloud framework for running end-to-end machine learning workflows based on TensorFlow Extended. 2.
Simply put, you get to focus on working on the core of your machine learning tasks while handling many of the other aspects for you.
Your first step with Kubeflow
Kubeflow can run anywhere Kubernetes can and we will start out by installing Kubeflow so you can try out some demos in this article and the following articles. To test out or familiarize yourself with Kubeflow I would recommend you run all the demos in kind or minikube which allows you to start a Kubernetes cluster built with the intention to run locally. To get started with no local setup you could run these on GitHub Codespaces or the Play with Kubernetes environment.
I also recommend using MiniKF if you try this out locally which makes it particularly easy and quick to get Kubeflow up.
To deploy Kubeflow in a kind cluster you could also use this convenience script (I recommend checking the official repository and upgrading Kubernetes or Kustomize versions if required):
Warning: The below command executes the script directly if you want to preview the script first please run
wget https://raw.githubusercontent.com/kubesimplify/kubeflow-series/main/kubeflow-machine-learning-on-kubeflow/scripts/kubeflow-kind.sh
wget -O - https://raw.githubusercontent.com/kubesimplify/kubeflow-series/main/kubeflow-machine-learning-on-kubeflow/scripts/kubeflow-kind.sh | bash
You might notice that the creation of some resources fails which is expected since for example the creation of CustomResources would be possible only after CustomResourceDefinitions are up. This creates quite a few resources in your cluster. You should ensure all the pods are ready before trying to connect to Kubeflow. You can check this by running:
kubectl get pods -n cert-manager
kubectl get pods -n istio-system
kubectl get pods -n auth
kubectl get pods -n knative-eventing
kubectl get pods -n knative-serving
kubectl get pods -n kubeflow
kubectl get pods -n kubeflow-user-example-com
The default way of accessing Kubeflow is via port-forward. This enables you to get started quickly. Run the following to port-forward Istio’s Ingress-Gateway to local port 8080:
kubectl port-forward svc/istio-ingressgateway -n istio-system 8080:80
Once you do this visiting http://localhost:8080 (or the external IP in case of a VM) and using the default credentials:
user@example.com
12341234
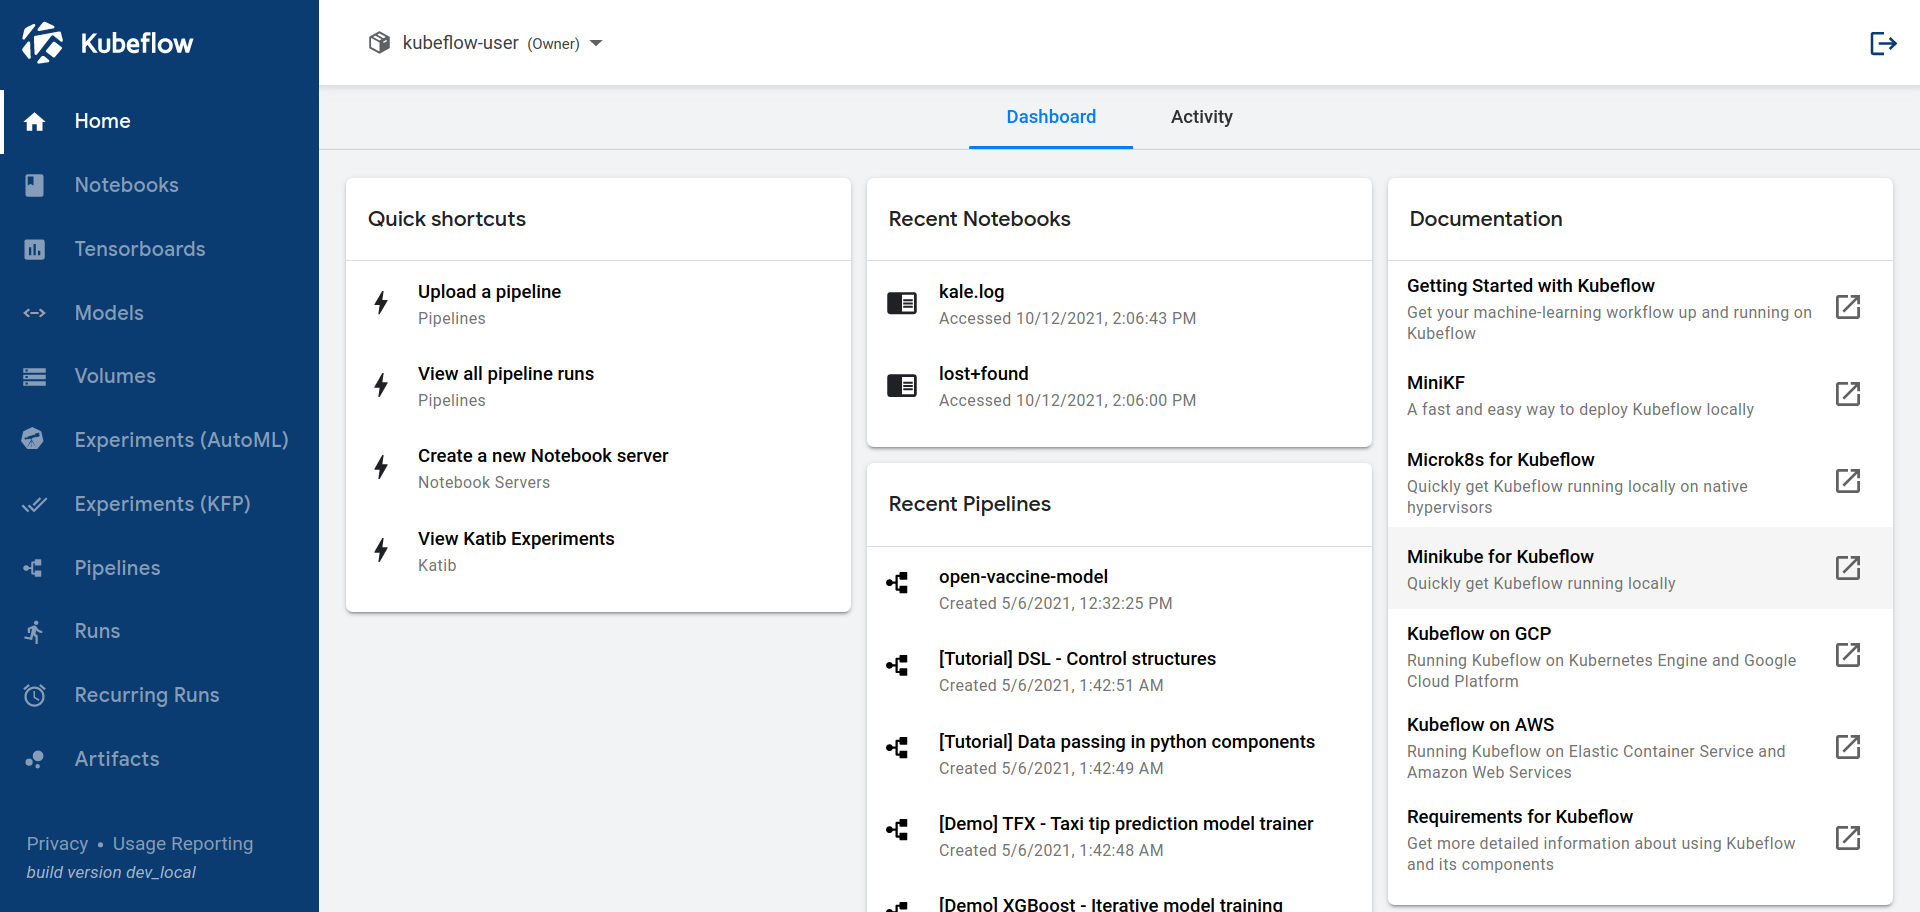
allows you to access the Kubeflow dashboard which should look something like this:

There are multiple packaged distributions of Kubeflow available for public clouds, a list of which and the installation instructions for each could be found here.
Kubeflow components
Kubeflow consists of logical parts called “components” that make up Kubeflow and we will be taking a look at each of these in detail over the next few articles in this series. You could use these components in a stand-alone manner or couple up a few or use all Kubeflow components too. You could also integrate additional tools with a Kubeflow deployment. As I mentioned earlier, Kubeflow is highly composable.

In this article, we will take a high-level view at the core Kubeflow components:
-
Central Dashboard: The central dashboard is probably the first thing you took a look at in Kubeflow, in the previous step. This provides quick access to the Kubeflow components deployed in your cluster and allows you to access them via the UI.
-
Kubeflow Notebooks: Machine learning is a very iterative process with a ton of experimentation you might need to do; Kubeflow Notebooks allows you to run development environments as containers inside a pod in your Kubernetes cluster with support for JupyterLab, RStudio, and VS Code though you can have support for anything with a custom container image. This particularly makes managing your experiments, environments and dynamically scaling very easy.
-
Kubeflow Pipelines: KFP is the component of Kubeflow I have personally used the most and also how I first discovered Kubeflow. KFP allows you to easily manage, create and deploy end-to-end scalable machine learning workflows. Think of this as an orchestrator for machine learning pipelines making experimentation and deployments pretty easy.
-
Katib: Allows you to work with automated machine learning tasks, hyperparameter tuning, and neural architecture search and supports various machine learning frameworks including PyTorch, TensorFlow, MXNet, and XGBoost. Hyperparameters are important parameters that cannot be directly estimated from the data or could be learned from the data. Finding the right values for hyperparameters is much dependent on previous experience and experimentation which is made easy with Katib. A rather detailed article by me about this can be found at 3. Neural Architecture Search allows you to automate the process of designing a neural network 4 5. Katib supports a ton of AutoML algorithms to help you do the search efficiently including but not limited to Hyperband 6, Random Search, Differentiable architecture search 7 and more.
-
Training Operators: These allow you to train your machine learning models in a distributed fashion in Kubeflow. At the moment, training operators support TensorFlow, PyTorch, MXNet, and XGBoost jobs which are essentially Kubernetes custom resources, a way to extend the Kubernetes API. The training operator also contains the Message Passing Interface Operator to make it particularly easy to work with all reduce style distributed training jobs, an AllReduce operation synchronizes neural network parameters between separate training processes after each step of the optimization, it does so by aggregating tensors across all the devices, adding them up, and then makes them available on each device. Though you can also use the
tf.distributeor thetorch.distributedAPIs, these are of course framework-specific 89. Finally, the training operator also includes supporting a job to run multiple pods with the Volcano scheduler. -
Multi Tenancy: Kubeflow is built in a manner to allow multiple people to easily collaborate on a project. Multi tenancy is built around user namespaces and user access is defined through RBAC (role-based access control) policies which already exist in Kubernetes. You could easily restrict each user to only worry about and interact with the Kubeflow components in their configuration.
These are the core components of Kubeflow however Kubeflow could also be paired with some more addons that allow you to extend the capabilities of Kubeflow including but not limited to KServe for model serving, Feature Store for feature storage, management, and serving, kale to orchestrate machine learning workflows and more.
A high-level overview of how Kubeflow works?
As we talked about earlier Kubeflow builds on Kubernetes as a system for deploying, scaling, and managing complex systems and allows Kubernetes to do what it is good at. This also allows you to run Kubeflow wherever Kubernetes can.

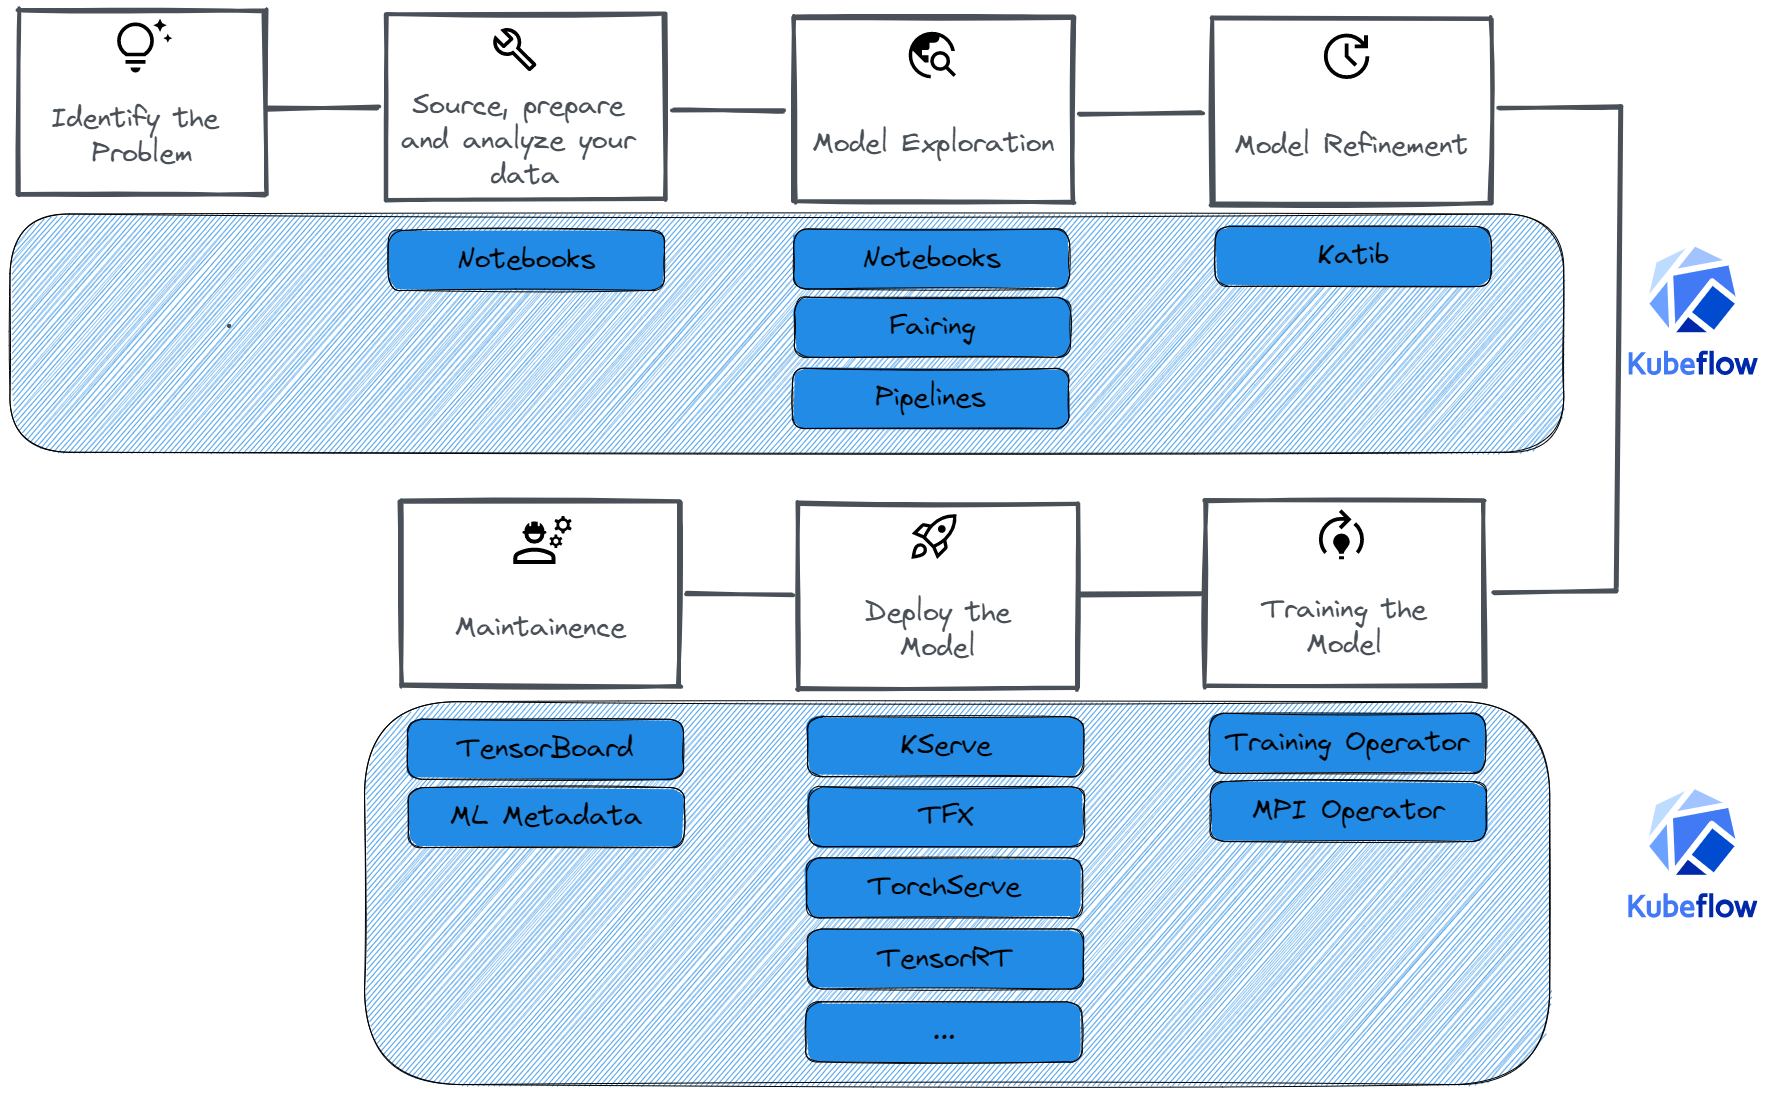
Taking much inspiration from 10 and kubeflow.org on a high level we will first define an ML workflow and also take a look at where Kubeflow could help in these stages:
-
Identify the problem: The first step as the name suggests involves Identifying the problem you want the ML system to solve as well as discussing model tradeoffs, and how outputs from the model would be used.
-
Source, prepare and analyze your data: This step involves defining the ground truth for the model, validating the quality of data, and labeling the data.
-
Model Exploration: This step starts off with first establishing a baseline performance for your tasks. This stage would involve you starting with a simple model using your initial data pipeline and quickly exploring many orthogonal ideas and running experiments. You can also find state-of-the-art models for your task and modify or try to reproduce them in an attempt to set up a benchmark on your dataset. This process is particularly focused on being able to quickly experiment and get an idea of what might work for you. This is exactly what Kubeflow Notebooks is built for: quick experimentation without the need to worry about managing the scaling.
-
Model refinement: This stage involves doing model-specific optimizations like finding the right set of hyperparameters. This stage might require you to go back to step 2 for targeted data collection (there are very few images in a particular style leading to wrong predictions for some important use cases) or to step 3 to further debug your models which might require you to reiterate on the previous steps too! Katib helps you here by allowing you to easily do hyperparameter tuning and neural architecture search.
-
Training the model: You would then want to train your Machine Learning model, this time around for far longer and to be ready to be put into production. Fortunately, this aspect of the ML workflow is well handled by the training operators in Kubeflow which support an array of frameworks. You might also need to evaluate your model on test distribution to understand the differences between train and test set distributions.
-
Deploy the model: Finally, now you can deploy your model which among others requires you to serve your model over a REST API, maintain model versions, perform model rollbacks, canary deployments, batch prediction, and scaling. You can use KServe or also use Kubeflow pipelines to orchestrate other ways of serving your models like TensorFlow Extended, TorchServe, TensorRT, and more.
-
Maintenance: The process, unfortunately, does not end at the “Deploy” step; you also need to be able to monitor live data and model prediction distributions and monitor for data and concept drifts. This data could also tell you if you need to retrain your model or what specific changes you might need to make. This stage is a valuable part of any ML workflow and with Kubeflow you could also use integrate TensorBoard to do just this.

It is also important to remember that machine learning systems are highly iterative; as you progress through the ML workflow, you’ll find yourself iterating on a section until reaching a satisfactory level of performance, then proceeding forward to the next task which may require you to reiterate on an even earlier step. Moreover, monitoring for skews, prediction quality, data drift, and concept drift after deploying a model is just as important and you should be prepared to iterate based on these real-world interactions.
Conclusion
Thank you for sticking with me until the end. I hope that you’ve taken away a thing or two about deploying machine learning and Kubeflow and enjoyed reading this. If you learned something new or enjoyed reading this article, please share it so that others can see it. Until then, see you in the next post!
We will take forward what we talk about in this article in the next article in this series where we will take a deeper dive into Kubeflow Notebooks, until then, adieu!
You can also find me on Twitter @rishit_dagli, where I tweet about machine learning, and open-source.
References
-
Sculley, D., Holt, G., Golovin, D., Davydov, E., Phillips, T., Ebner, D., Chaudhary, V., Young, M., Crespo, J.F., & Dennison, D. (2015). Hidden Technical Debt in Machine Learning Systems. In Advances in Neural Information Processing Systems. Curran Associates, Inc.. ↩
-
An Introduction to Kubeflow. https://www.kubeflow.org/docs/started/introduction/#history. ↩
-
The Art of Hyperparameter Tuning in Deep Neural Nets by Example. https://medium.com/towards-data-science/the-art-of-hyperparameter-tuning-in-deep-neural-nets-by-example-685cb5429a38. ↩
-
Elsken, T., Metzen, J. H., & Hutter, F. (2019). Neural architecture search: A survey. The Journal of Machine Learning Research, 20(1), 1997-2017. ↩
-
Stanley, K., & Miikkulainen, R. (2002). Evolving neural networks through augmenting topologies. Evolutionary computation, 10(2), 99–127. ↩
-
Li, L., Jamieson, K., DeSalvo, G., Rostamizadeh, A., & Talwalkar, A. (2017). Hyperband: A novel bandit-based approach to hyperparameter optimization. The Journal of Machine Learning Research, 18(1), 6765-6816. ↩
-
Liu, H., Simonyan, K., & Yang, Y. (2018). Darts: Differentiable architecture search. arXiv preprint arXiv:1806.09055. ↩
-
Gibiansky, A. (2017). Bringing HPC techniques to deep learning. Baidu Research, Tech. Rep. ↩
-
Sergeev, A., & Del Balso, M. (2018). Horovod: fast and easy distributed deep learning in TensorFlow. arXiv preprint arXiv:1802.05799. ↩
-
Breck, E., Cai, S., Nielsen, E., Salib, M., & Sculley, D. (2017, December). The ML test score: A rubric for ML production readiness and technical debt reduction. In 2017 IEEE International Conference on Big Data (Big Data) (pp. 1123-1132). IEEE. ↩