Machine Learning with Android 11: What’s new?
This blog demonstrates how you can get started with on-device ML with tools or plugins specifically launched with Android 11. If you have earlier worked with ML in Android, you will explore easier ways to integrate your ML applications with your Android apps. If you have not worked with ML in Android earlier, this could be a starting point for you to do so and start super powering your Android app with Machine Learning. In this blog, I majorly demonstrate the two biggest updates with Android 11: ML Model Binding Plugin and the new ML Kit. All of the example apps code as we discuss below is present in this GitHub repo.
You can also check out the talks I gave about this topic in the GitHub repo: https://github.com/Rishit-dagli/ML-with-Android-11/blob/master/talks.md .
Why care about on-device ML in Android?
As you will notice we majorly focus on on-device ML in this blog, Android 11 has a lot of cool updates for on-device ML but let’s talk in brief about why you should care about it, you will also understand why there is such hype about on-device ML or ML on edge.
The idea behind on-device ML
The idea here is to use ML such that opposed to the traditional approach I no longer send my data to a server or some cloud-based system which then does the ML and then returns me the outputs. I instead get outputs or inferences from my ML model on the device itself that is I no longer send data out of my device itself. I also do all the processing and the inference on the mobile device itself.
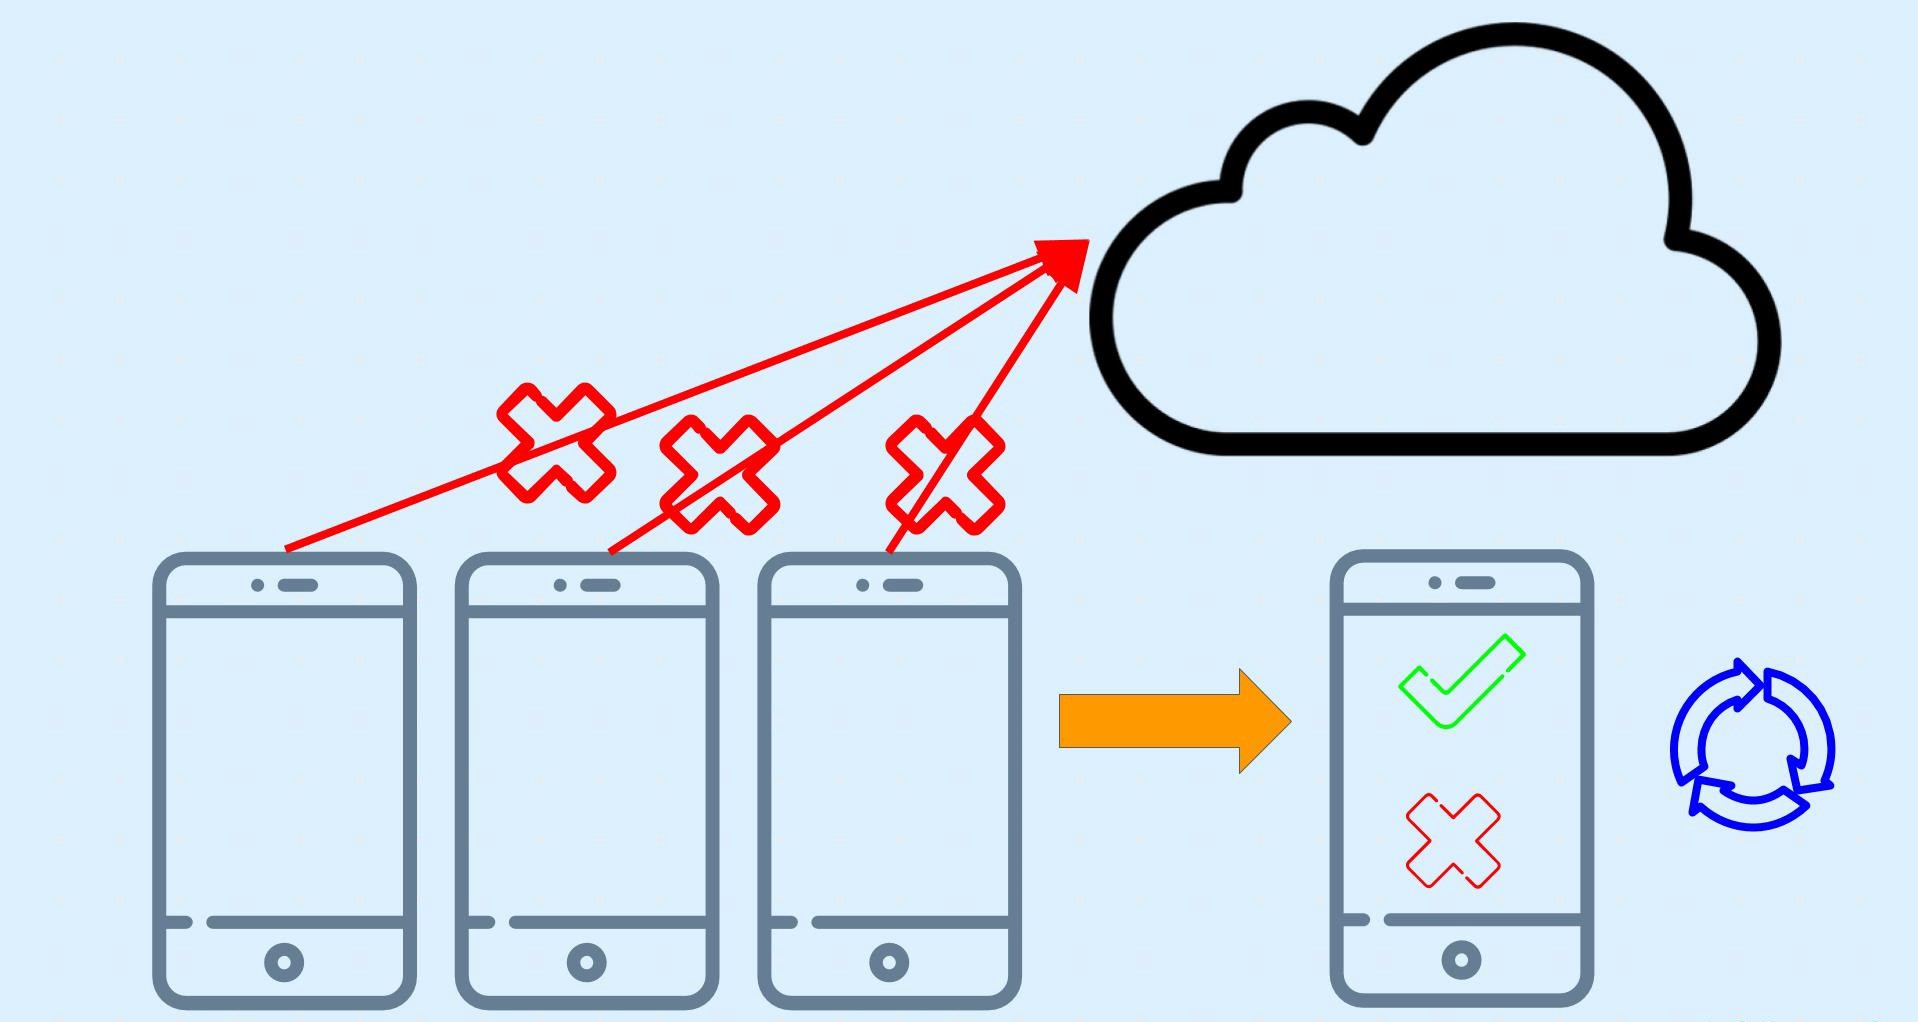
You would not directly use the model for your edge device. You would need to compress it or optimize the model so you can run it on the edge device as it has limited computation power, network availability, and disk space. In this document, however, we will not be discussing the optimization process. We will be deploying a .tflite model file. You can read more about TensorFlow Lite and the Model Optimization process with TensorFlow Lite.
Advantages of on-device ML
Here I have listed some advantages of using on-device ML:
- Power consumption
So the first thing that would come to your mind is power consumption, you spend a lot of power sending or streaming video data continuously to a server and sometimes it becomes infeasible to do so. However, also worth a mention sometimes the opposite could also be true when you employ heavy pre-processing.
- Inference time
Another important thing to consider is the time it takes me to get the output or essentially run the model. For real-time applications, this is a pretty important aspect to consider. Without sending the data and having to receive it back I speed up my inference time too.
- Network availability
Using the traditional approach is also expensive in terms of network availability. I should have the bandwidth or network to continuously send the data and receive inferences from the server.
- Security
And finally security I no longer send data to a server or cloud-based system, I no longer send data out of the device at all thus enforcing security.
ML Model Binding Plugin
Note: You need Android Studio 4.1 or above to be able to use the Model Binding Plugin
What does the Model Binding Plugin focus on?
You can make a fair enough guess from the name “Model Building” so as to what the ML Model Binding Plugin would do allow us to use custom TF Lite Models very easily. This lets developers import any TFLite model, read the input/output signature of the model, and use it with just a few lines of code that calls the open-source TensorFlow Lite Android Support Library.
The ML model binding plugin makes it super easy for you to use a TF model in your app. You essentially have a lot less code to write that calls the TensorFlow Lite Android Support Library. If you have worked with TensorFlow Lite models you maybe know that you first need to convert everything to a ByteArray you no longer have to convert everything to ByteArray anymore with the ML Model Binding Plugin.
What I also love about this new plugin is you can easily use make use of GPUs and the NN API very easily. With the model binding plugin using them has never been easier. Using them is now just a dependency call and a single line of code away isn’t that cool what you can do with the Model Binding plugin. With Android 11 The Neural Network API you also have unsigned integer weight support and a new Quality of Service (QOS) API too supporting even more edge scenarios. And Of course, this would make your development a lot faster with the features we just talked about.
Using the Model Binding Plugin
Let us now see how we can implement all that we talked about.
So the first step is to import a TensorFlow Lite model with metadata. Android Studio now has a new option for importing the TensorFlow model, just right click on the module you want to import it in and you will see an option under others called TF Lite model.
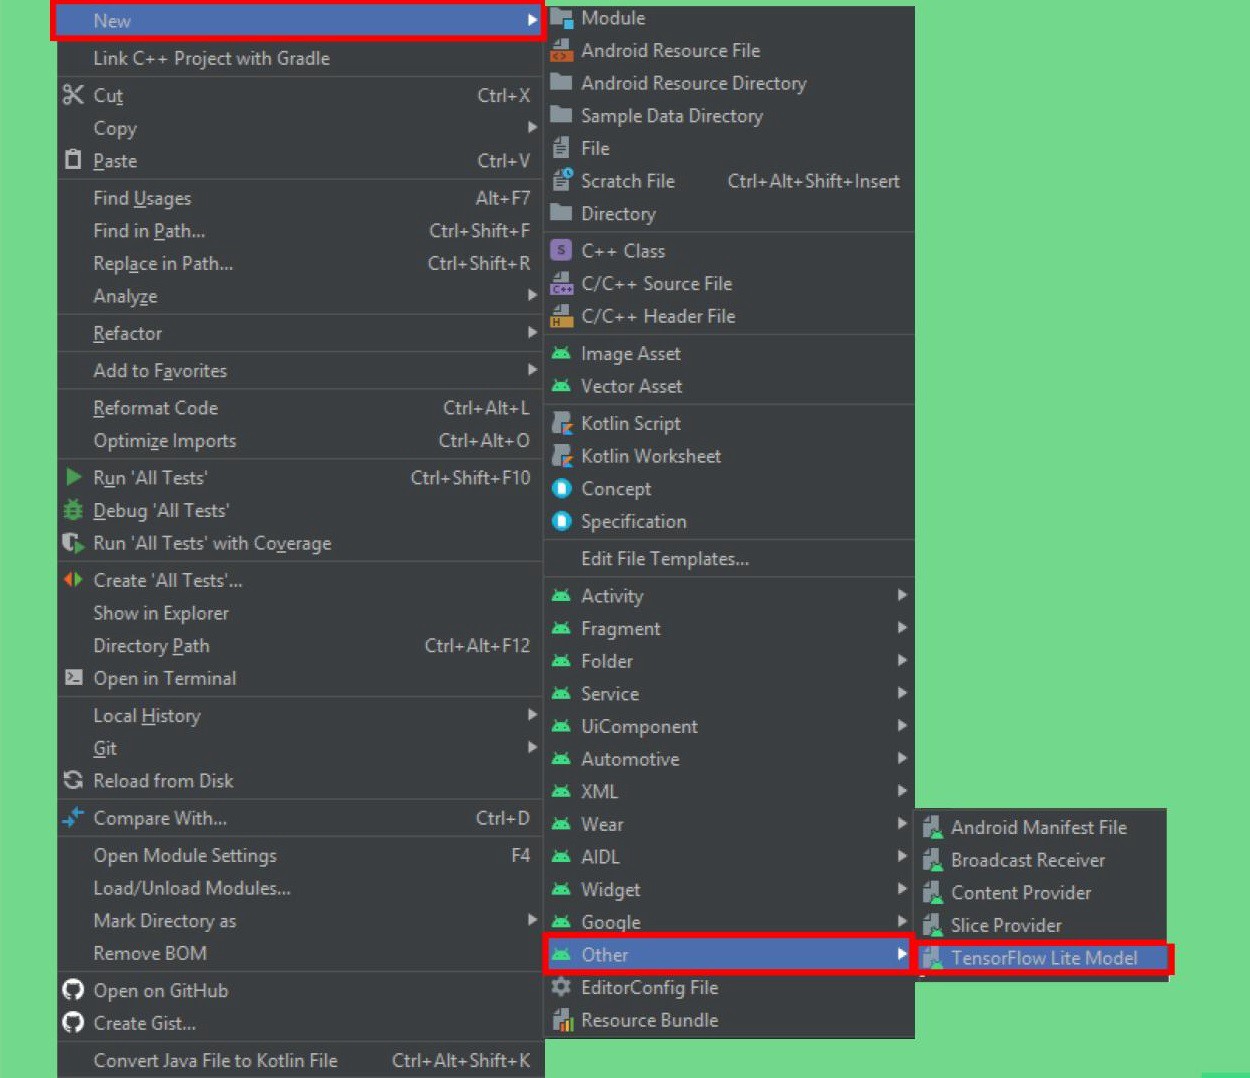
You can now just pass in the path of your tflite model, it will import the model for you in a directory in the module you selected earlier called ml from where you will be able to use the model. Adding the dependencies and GPU acceleration too is just a click away.

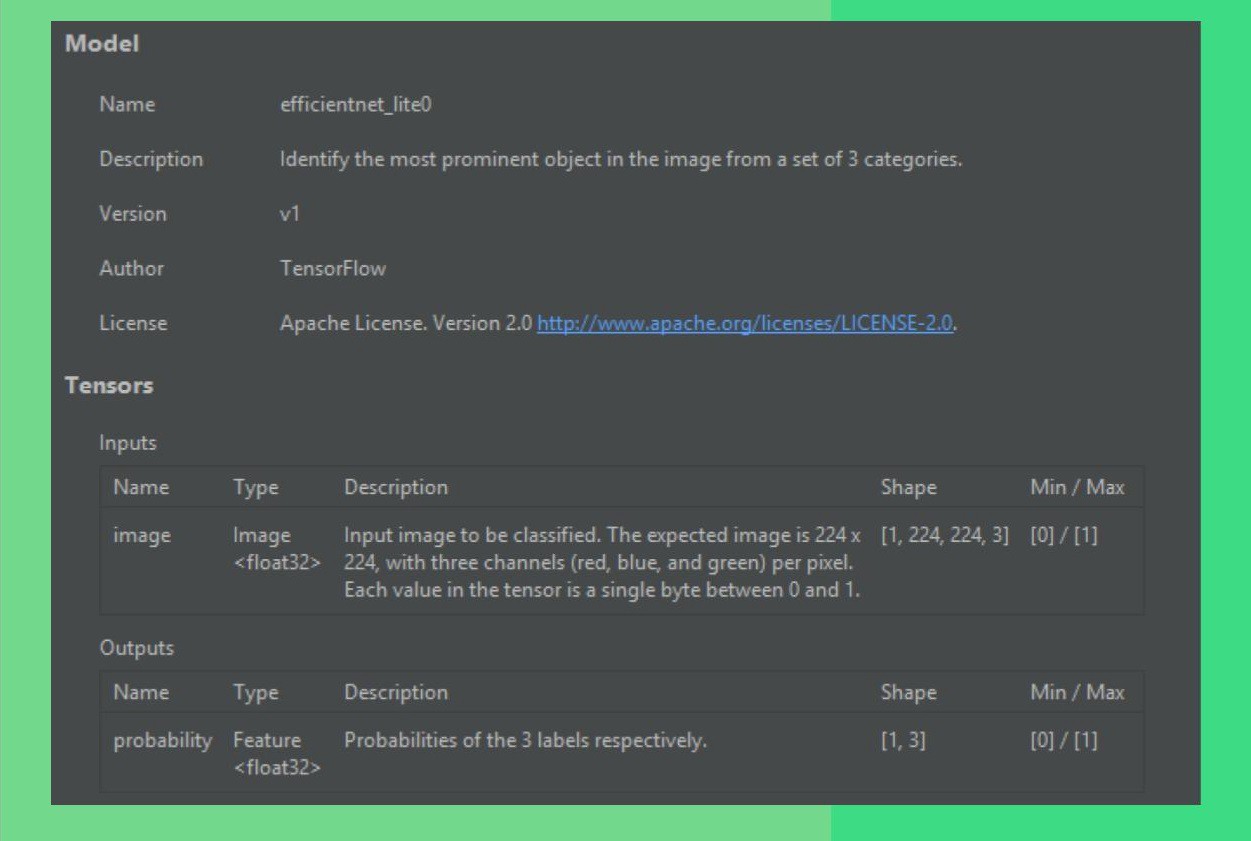
So now from my model metadata, I can also know the input, output shapes, and a lot more that I would need to use it, you can see this info by opening the tflite model file in Android Studio. So in this screenshot, I am using an open-source model made by me to classify between rock, paper, and scissors. So you just show your hand in front of the camera and it identifies if it’s a rock paper or scissor, and that’s what I demonstrate here too.
Let’s finally start using the model, so for a streaming inference which is most probably what you would want to do; live image classification. The easiest way would be to use Camera X and pass each frame to a function which can perform the inference. So what I’m interested as of now is the function which does the inference. You will see how easy it is to do this, a sample code for this also seems when you import a TF Lite Model which you can use.
private val rpsModel = RPSModel.newInstance(ctx)
So we’ll start by instantiating a rps model short for a rock paper scissors model and pass it the context. With the plugin, my model name was RPS Model.tflite so a class of the exact same name would be made for you so I have a class called RPS Model.
val tfImage = TensorImage.fromBitmap(toBitmap(imageProxy))
Once you do this you need to convert your data into a form which we can use so we’ll convert it to a Tensor Image from bitmap, if you used the TF Interpreter you know that you need to convert your image to a ByteArray, you don’t need to do that anymore and you’ll feed in an image proxy
val outputs = rpsModel.process(tfImage)
    .probabilityAsCategoryList.apply {
        sortByDescending { it.score } // Sort with highest confidence first
    }.take(MAX_RESULT_DISPLAY) // take the top results
So now we will pass in the data to the model so first we will process the image from the model and get the outputs we will essentially get an array of probabilities and perform a descending sort on it as we want to show the label which has most probability and then pick first n results to show.
for (output in outputs) {
    items.add(
        Recognition(
            output.label,
            output.score
        )
    )
}
And finally, I want to show users the labels so I will add the label corresponding to each entry in the outputs. And that’s all you need 🚀
Leveraging GPU Acceleration
If you want to use GPU acceleration again it is made very easy for you so you will make an options object where I specify it to use GPU and build it. In the instantiation part, I would just pass this in as an argument and you can use the GPU. It also makes it very easy to use the NN API for acceleration to do even more and with Android 11.
private val options = Model.Options.Builder().setDevice(Model.Device.GPU).build() private val rpsModel = rpsModel.newInstance(ctx, options)
A new ML Kit
You now no longer need a Firebase Project to work with the ML Kit, it is now available even out of Firebase.
The other notable update Another way to implement a TensorFlow Lite model is via ML Kit. And before I move on ML Kit is now available even without having to use a Firebase project, you can now use ML Kit even without a Firebase project.
As I mentioned earlier a lot of updates in Android 11 are focused on on-device ML due to the benefits I mentioned earlier. The new ML Kit now has better usability for on-device ML. The ML Kit image classification and object detection and tracking (ODT) now also support custom models, which means now you can also have a tflite model file along with this. This also means if you are working on some generic use case like a specific kind of object detection ML Kit is the best thing to use.
Using the ML Kit
Let’s see this in code and see an example of this. So here as an example I build a model which can classify different food items,
private localModel = LocalModel.Builder()
    .setAssetFilePath("lite-model_aiy_vision_classifier_food_V1_1.tflite").
    .build()
So I will first start off by setting the model and specifying the tflite model file path for it.
private val customObjectDetectorOptions = CustomObjectDetectorOptions
    .Builder(localModel)
    .setDetectorMode(CustomObjectDetectorOptions.STREAM_MODE)
    .setClassificationConfidenceThreshold(0.8f)
    .build()
This tflite model will then run on top of the Object detection model with ML Kit so you can customize these options a bit. Here I have specifically used the STREAM_MODE as I want to work with streaming input and also specify the confidence threshold.
private val objectDetector = ObjectDetection.getClient(customObjectDetectorOptions) objectDetector.process(image)
    .addOnFailureListener(Log.d(...))

    .addOnSuccessListener{
        graphicsOverlay.clear()
        for (detectedObject in it){
            graphicsOverlay.add(ObjectGraphic(graphicsOverlay, detectedObject))
        }
        graphicsOverlay.postInvalidate()}

    .addOnCompleteListenerl imageProxy.close() }
So let us get to the part where we run the model so you might see some syntax similar to the previous example here. I will process my image and a thing to note here is all of these listeners that are on failure or on success are essential tasks so they need to be attached for every run. And that is all you need to do, we are done 🚀
Finding Models
We talked a lot about what after making a model let us take a look at how you can find models for your use-cases.
- TF Lite Model Maker
TF Lite Model Maker too was announced by The TensorFlow Team earlier in 2020. This makes making good models super easy to use, gives high performance, and also allows for a good amount of customization. You can simply pass in the data and use little code to build a tflite model. You can take a look at the TensorFlow Lite Model Maker Example present in the repo.
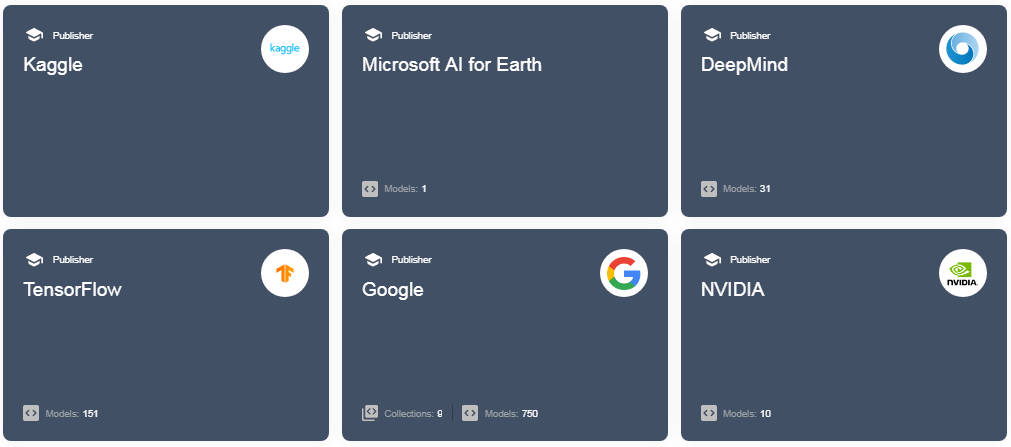
- TensorFlow Hub
TensorFlow Hub is an open-source repository of state of the art and well documented, models. The food classification app we built with ML Kit is also present on TF Hub. You also get to use models from the community. You can find these at tfhub.dev.
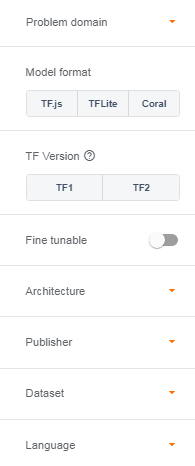
You can search for models in TF Hub with a number of filters like Problem Domain if you only want to find image or text-based models, the Model format if you want to run it on the web, on edge devices, or on Corals, filter the architecture, datasets used and much more.
You can further directly download these models from TF Hub or also perform transfer learning on them with your own data very easily. However, for the scope of this blog, we will not be covering Transfer Learning with TF Hub, you can know more about it in this blog by me.
And many more! There are a lot of services like Teachable Machine, AutoML, and many more but these are the major ones.
All the code demonstrated here with examples about TF Lite Model Maker is present in this repo. I have also included a few trained models for you in the repo to get started and experiment with for starters. https://github.com/Rishit-dagli/ML-with-Android-11 .
Conclusion
Thank you for sticking with me until the end. I hope that you’ve taken away a thing or two about Machine Learning on Android, and enjoyed reading this. If you learned something new or enjoyed reading this article, please share it so that others can see it. Until then, see you in the next post!
You can also find me on Twitter @rishit_dagli, where I tweet about machine learning, and open-source.